Tuesday 29 January 2019

Eclipse With Python

Hi Guys,

Today i'll share how to start python project in eclipse IDE.
to start Py development in eclipse we need to add Py Dev plugin in eclipse IDE.
open Eclipse IDE go to Help-->Install New Software .. you'll see the below screen.

copy and paste the url as http://www.pydev.org/updates  check the all option and unchecked the contact all update sites during install to find required software.

Click on next and finish.
After installation restart the eclipse IDE and see the Py Dev Project under File-->New-->Others wizard.
Now start Python coding.

Cheers :)


Monday 28 January 2019

Cannot auto configure pydev in eclipse - Auto-configure could not find a valid interpreter

Unable to Auto Configure with Eclipse-

Hi Guys, All we know we can create python projects in eclipse using pydev plugin but sometimes we faced issue while creating python project in eclipse -Project interpreter not specified.


this means your Py project not able to find the appropriate interpreter, to resolve this issue need to configure the interpreter.
for configuring the interpreter manually please follow the below steps-
S1- Click on please configure an interpreter before proceeding in your project window popup.
S2- select choose from the list.

S3- again you will find another error.

S4- to resolve this error we have to install actual python package from below url.
S5- Download and install Python package then again repeat step 1,2.
S6- Now select all from the popup and click on Ok.
Now interpreter has been configured, please restart the eclipse and create python project using Files-->new-->Other-->PyDev project

and run the project.
let me know if anybody still facing the same issue.

cheers guys :)

Tuesday 6 November 2018

Variables in Java

Hi Guys, In this post I'll share some Basic Variable Concepts in Java which will very help full for beginners.
Guys be ready to implement those concepts in your system after getting boost up .

What's a variable Gys?
In a discussion friends i found, A variable can be thought of as a container which holds value for you, during the life of a Java program. Every variable is assigned a data type which designates the type and quantity of value it can hold.
In order to use a variable in a program you to need to perform 2 steps -

  • Variable Declaration- To declare a variable, you must specify the data type & give the variable a unique name.

Examples of other Valid Declarations are

int a,b,c;
float pi;
double d;
char a;

  • Variable Initialization- To initialize a variable, you must assign it a valid value.

Example of other Valid Initializations are
pi =3.14f;
do =20.22d;
a=’v’;
You can combine variable declaration and initialization.


Example-

int a=2,b=4,c=6;
float pi=3.14f;
double do=20.22d;
char a=’v’;

Types Of variable in Java- There are three types of variable in java.
1). Local variable- Local Variables are a variable that are declared inside the body of a method.
2). Instance Variable- Instance variables are defined without the STATIC keyword .They are defined Outside a method declaration. They are Object specific and are known as instance variables.
3). Static Variable- Static variables are initialized only once, at the start of the program execution. These variables should be initialized first, before the initialization of any instance variables.

Data Types in Java- Data types classify the different values to be stored in the variable. In java, there are two types of data types:

1). Primitive Data Types
2). Non-primitive Data Types
Primitive Data Types are predefined and available within the Java language. Primitive values do not share state with other primitive values.

There are 8 primitive types: byte, short, int, long, char, float, double, and boolean Integer data types
byte (1 byte)
short (2 bytes)
int (4 bytes)
long (8 bytes)


Floating Data Type-
float (4 bytes)
double (8 bytes)
Textual Data Type-
char (2 bytes)
Logical-
boolean (1 byte) (true/false
Java Data Types-

Java Variable Type Conversion & Type Casting
A variable of one type can receive the value of another type. Here there are 2 cases -
Case 1). Variable of smaller capacity is be assigned to another variable of bigger capacity.
This process is Automatic, and non-explicit is known as Conversion

Case 2)- Variable of larger capacity is be assigned to another variable of smaller capacity
In such cases, you have to explicitly specify the type cast operator. This process is known as Type Casting.

In case, you do not specify a type cast operator; the compiler gives an error. Since this rule is enforced by the compiler, it makes the programmer aware that the conversion he is about to do may cause some loss in data and prevents accidental losses.

Cheers Friends :)

Java Opps Concept

Hi Guys, In this post I'll share some Basic Opps Concepts.which will very help full for beginners.
Gys be ready to implement those concepts in your system after getting boost up .


Object Oriented Programming is a programming concept that works on the principle that objects are the most important part of your program. It allows users create the objects that they want and then create methods to handle those objects. Manipulating these objects to get results is the goal of Object Oriented Programming.


Object Oriented Programming popularly known as OOP, is used in a modern programming language like Java

Core Building Blocks of OPPS - There are 10 Pillars of OPPS which are explained briefly below.

1) Class- The class is a group of similar entities. It is only an logical component and not the physical entity. For example, if you had a class called “Expensive Cars” it could have objects like Mercedes, BMW, Toyota, etc. Its properties(data) can be price or speed of these cars. While the methods may be performed with these cars are driving, reverse, braking etc.

2) Object- An object can be defined as an instance of a class, and there can be multiple instances of a class in a program. An Object contains both the data and the function, which operates on the data. For example - chair, bike, marker, pen, table, car, etc.

3) Inheritance-computer programs are designed in such a way where everything is an object that interact with one another. Inheritance is one such concept where the properties of one class can be inherited by the other. It helps to reuse the code and establish a relationship between different classes.
As we can see in the image, a child inherits the properties from his father. Similarly, in Java, there are two classes:
1. Parent class ( Super or Base class)
2. Child class (Subclass or Derived class )
A class which inherits the properties is known as Child Class whereas a class whose properties are inherited is known as Parent class.
Inheritance is further classified into 4 types:
So let’s begin with the first type of inheritance i.e. Single Inheritance:
1). Single Inheritance- In single inheritance, one class inherits the properties of another. It enables a derived class to inherit the properties and behavior from a single parent class. This will in turn enable code re usability as well as add new features to the existing code.

Here, Class A is your parent class and Class B is your child class which inherits the properties and behavior of the parent class.
Let’s see the syntax for single inheritance:
Class A
{
---
}
Class B extends A {
---
}

2). Multilevel Inheritance- When a class is derived from a class which is also derived from another class, i.e. a class having more than one parent class but at different levels, such type of inheritance is called Multilevel Inheritance.
If we talk about the flowchart, class B inherits the properties and behavior of class A and class C inherits the properties of class B. Here A is the parent class for B and class B is the parent class for C. So in this case class C implicitly inherits the properties and methods of class A along with Class B. That’s what is multilevel inheritance.

Let’s see the syntax for multilevel inheritance in Java:
Class A{
---
}
Class B extends A{
---
}
Class C extends B{
---
}

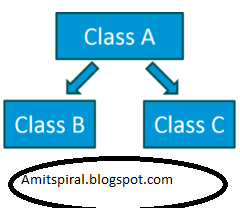
3). Hierarchical Inheritance- When a class has more than one child classes (sub classes) or in other words, more than one child classes have the same parent class, then such kind of inheritance is known as hierarchical.

If we talk about the flowchart, Class B and C are the child classes which are inheriting from the parent class i.e Class A.
Let’s see the syntax for hierarchical inheritance in Java:
Class A{
---
}
Class B extends A{
---
}
Class C extends A{
---
}
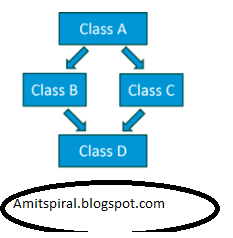
4). Hybrid Inheritance- Hybrid inheritance is a combination of multiple inheritance and multilevel inheritance. Since multiple inheritance is not supported in Java as it leads to ambiguity, so this type of inheritance can only be achieved through the use of the interfaces. 

If we talk about the flowchart, class A is a parent class for class B and C, whereas Class B and C are the parent class of D which is the only child class of B and C.

Now we have learned about inheritance and their different types. Let’s switch to another object oriented programming concept i.e Encapsulation.

4) Encapsulation- Encapsulation is a mechanism where you bind your data and code together as a single unit. It also means to hide your data in order to make it safe from any modification. What does this mean? The best way to understand encapsulation is to look at the example of a medical capsule, where the drug is always safe inside the capsule. Similarly, through encapsulation the methods and variables of a class are well hidden and safe.

We can achieve encapsulation in Java by:
Declaring the variables of a class as private.
Providing public setter and getter methods to modify and view the variables values.
Let us look at the code below to get a better understanding of encapsulation:
public class Employee {
 private String name;
 public String getName() {
 return name;
 }
 public void setName(String name) {
 this.name = name;
 }
 public static void main(String[] args) {
 }
}
Let us try to understand the above code. I have created a class Employee which has a private variable name. We have then created a getter and setter methods through which we can get and set the name of an employee. Through these methods, any class which wishes to access the name variable has to do it using these getter and setter methods.

5) Abstraction- Abstraction refers to the quality of dealing with ideas rather than events. It basically deals with hiding the details and showing the essential things to the user. If you look at the image here, whenever we get a call, we get an option to either pick it up or just reject it. But in reality, there is a lot of code that runs in the background. So you don’t know the internal processing of how a call is generated, that’s the beauty of abstraction. Therefore, abstraction helps to reduce complexity. You can achieve abstraction in two ways:
a) Abstract Class
b) Interface

Let’s understand these concepts in more detail.

Abstract class: Abstract class in Java contains the ‘abstract’ keyword. Now what does the abstract keyword mean? If a class is declared abstract, it cannot be instantiated, which means you cannot create an object of an abstract class. Also, an abstract class can contain abstract as well as concrete methods.
Note: You can achieve 0-100% abstraction using abstract class.

To use an abstract class, you have to inherit it from another class where you have to provide implementations for the abstract methods there itself, else it will also become an abstract class.

Let’s look at the syntax of an abstract class:

Abstract class Mobile {   // abstract class mobile
Abstract void run();      // abstract method

Interface- Interface in Java is a blueprint of a class or you can say it is a collection of abstract methods and static constants. In an interface, each method is public and abstract but it does not contain any constructor. Along with abstraction, interface also helps to achieve multiple inheritance in Java.
Note: You can achieve 100% abstraction using interfaces.
So an interface basically is a group of related methods with empty bodies. Let us understand interfaces better by taking an example of a ‘ParentCar’ interface with its related methods.

public interface ParentCar {
public void changeGear( int newValue);
public void speedUp(int increment);
public void applyBrakes(int decrement);
}
These methods need be present for every car, right? But their working is going to be different.

Let’s say you are working with manual car, there you have to increment the gear one by one, but if you are working with an automatic car, that time your system decides how to change gear with respect to speed. Therefore, not all my subclasses have the same logic written for change gear. The same case is for speedup, now let’s say when you press an accelerator, it speeds up at the rate of 10kms or 15kms. But suppose, someone else is driving a super car, where it increment by 30kms or 50kms. Again the logic varies. Similarly for applybrakes, where one person may have powerful brakes, other may not.

Since all the functionalities are common with all my subclasses, I have created an interface ‘ParentCar’ where all the functions are present. After that, I will create a child class which implements this interface, where the definition to all these method varies.

Next, let’s look into the functionality as to how you can implement this interface.
So to implement this interface, the name of your class would change to any particular brand  of a Car, let’s say I’ll take an “Audi”. To implement the class interface, I will use the ‘implement’ keyword as seen below:
public class Audi implements ParentCar {
int speed=0;
int gear=1;
public void changeGear( int value){
gear=value;
}
public void speedUp( int increment)
{
speed=speed+increment;
}
public void applyBrakes(int decrement)
{
speed=speed-decrement;
}
void printStates(){
System.out.println("speed:"+speed+"gear:"+gear);
}
public static void main(String[] args) {
// TODO Auto-generated method stub
Audi A6= new Audi();
A6.speedUp(50);
A6.printStates();
A6.changeGear(4);
A6.SpeedUp(100);
A6.printStates();
}
}
Here as you can see, I have provided functionalities to the different methods I have declared in my interface class. Implementing an interface allows a class to become more formal about the behavior it promises to provide. You can create another class as well, say for example BMW class which can inherit the same interface ‘car’ with different functionalities.

6). Polymorphism- Polymorphism means taking many forms, where ‘poly’ means many and ‘morph’ means forms. It is the ability of a variable, function or object to take on multiple forms. In other words, polymorphism allows you define one interface or method and have multiple implementations.

Let’s understand this by taking a real-life example and how this concept fits into Object oriented programming.
Let’s consider this real world scenario in cricket, we know that there are different types of bowlers i.e. Fast bowlers, Medium pace bowlers and spinners. As you can see in the above figure, there is a parent class- BowlerClass and it has three child classes: FastPacer, MediumPacer and Spinner. Bowler class has bowlingMethod() where all the child classes are inheriting this method. As we all know that a fast bowler will going to bowl differently as compared to medium pacer and spinner in terms of bowling speed, long run up and way of bowling, etc. Similarly a medium pacer’s implementation of bowlingMethod() is also going to be different as compared to other bowlers. And same happens with spinner class.
The point of above discussion is simply that a same name tends to multiple forms. All the three classes above inherited the bowlingMethod() but their implementation is totally different from one another.

Polymorphism in Java is of two types:

Run time polymorphism
Compile time polymorphism
Run time polymorphism: In Java, runtime polymorphism refers to a process in which a call to an overridden method is resolved at runtime rather than at compile-time. In this, a reference variable is used to call an overridden method of a superclass at run time. Method overriding is an example of run time polymorphism. Let us look  the following code to understand how the method overriding works:

public Class BowlerClass{
void bowlingMethod()
{
System.out.println(" bowler ");
}
public Class FastPacer{
void bowlingMethod()
{
System.out.println(" fast bowler ");
}
Public static void main(String[] args)
{
FastPacer obj= new FastPacer();
obj.bowlingMethod();
}
}
Compile time polymorphism: In Java, compile time polymorphism refers to a process in which a call to an overloaded method is resolved at compile time rather than at run time. Method overloading is an example of compile time polymorphism. Method Overloading is a feature that allows a class to have two or more methods having the same name but the arguments passed to the methods are different. Unlike method overriding, arguments can differ in:

Number of parameters passed to a method
Datatype of parameters
Sequence of datatypes when passed to a method.
Let us look at the following code to understand how the method overloading works:

class Adder {
Static int add(int a, int b)
{
return a+b;
}
static double add( double a, double b)
{
return a+b;
}

public static void main(String args[])
{
System.out.println(Adder.add(11,11));
System.out.println(Adder.add(12.3,12.6));
}
}

7) Association- Association is a relationship between two objects. It defines the diversity between objects. In this OOP concept, all object have their separate lifecycle, and there is no owner. For example, many students can associate with one teacher while one student can also associate with multiple teachers.

8) Aggregation- In this technique, all objects have their separate lifecycle. However, there is ownership such that child object can’t belong to another parent object. For example consider class/objects department and teacher. Here, a single teacher can’t belong to multiple departments, but even if we delete the department, the teacher object will never be destroyed.

9) Composition-A composition is a specialized form of Aggregation. It is also called "death" relationship. Child objects do not have their lifecycle so when parent object deletes all child object will also delete automatically. For that, let’s take an example of House and rooms. Any house can have several rooms. One room can’t become part of two different houses. So, if you delete the house room will also be deleted.

Advantages of OOPS-
OOP offers easy to understand and a clear modular structure for programs.
Objects created for Object-Oriented Programs can be reused in other programs. Thus it saves significant development cost.
Large programs are difficult to write, but if the development and designing team follow OOPS concept then they can better design with minimum flaws.
It also enhances program modularity because every object exists independently.

Comparison of OOPS with other programming styles with help of an Example -
Let's understand with example how OOPs is different than other programming approaches.
Programming languages can be classified into 3 primary types

A). Unstructured Programming Languages- The most primitive of all programming languages having sequentially flow of control. Code is repeated through out the program
B). Structured Programming Languages- Has non-sequentially flow of control. Use of functions allows for re-use of code.
C). Object Oriented Programming: Combines Data & Action Together.

Let's understand these 3 types with an example.
Suppose you want to create a Banking Software with functions like

1. Deposit
2. Withdraw
3. Show Balance

Unstructured Programming Languages-
The earliest of all programming language were unstructured programming language. A very elementary code of banking application in unstructured Programming language will have two variables of one account number and another for account balance
balance
int account_number=20;
int account_balance=100;
Suppose deposit of 100 dollars is made.
account_balance=account_balance+100
Next you need to display account balance.
printf(“Account Number=%d,account_number)
printf(“Account Balance=%d,account_balance)
Now the amount of 50 dollars is withdrawn.
account_balance=account_blance-50
Again, you need to display the account balance.
printf(“Account Number=%d,account_number)
printf(“Account Balance=%d,account_balance)
For any further deposit or withdrawal operation – you will code repeat the same lines again and again.
Structured Programming- With the arrival of Structured programming repeated lines on the code were put into structures such as functions or methods. Whenever needed, a simple call to the function is made.
Object-Oriented Programming- In our program, we are dealing with data or performing specific operations on the data.
In fact, having data and performing certain operation on that data is very basic characteristic in any software program.
Experts in Software Programming thought of combining the Data and Operations. Therefore, the birth of Object Oriented Programming which is commonly called OOPS.
The same code in OOPS will have same data and some action performed on that data.
Class Account{
 int account_number;
 int account_balance;
public void showdata(){
 system.out.println(“Account Number”+account_number)
 system.outprintln(“Account Balance”+ account_balance)
}
}
By combining data and action, we will get many advantages over structural programming viz,

Abstraction
Encapsulation
Inheritance
Polymorphism

Cheers Guys :) Happy Deewali.

Frequently Asked Oracle ADF Interview Question and Answer Part 3

Hi Guys, In this post I'll share some interview questions and answers which i have faced or asked in interview panel.You can read my Part 1 QA by using url PART 1 QA and ADF PART QA 2.


1). What are the ADF templates, jspx pages, jsff page & declarative components?
Ans). ADF Faces provides the following types of reusable building blocks
·  Page fragments(.jsff): Page fragments allow you to create parts of a page. A JSF page can be made up of one or more page fragments. For example, a large JSF page can be broken up into several smaller page fragments for easier maintenance. 
We can create an page fragments template & use to create page fragments.

·  Page templates (.jspx): By creating page templates, you can create entire page layouts using individual components and page fragments. For example, if you are repeatedly laying out some components in a specific way in multiple JSF pages, consider creating a page template for those pages. When you use the page template to build your pages, you can be sure that the pages are always consistent in structure and layout across the application. 
Using default layouts or creating new we can create page templates.
Ex. Using <f:facet> we can create page templates with header, footer, top, left & right regions etc. 

·  Declarative components: The declarative components feature allows you to assemble existing, individual UI components into one composite, reusable component, which you then declaratively use in one or more pages. 
For example, if you are always inserting a group of components in multiple places, consider creating a composite declarative component that comprises the individual components, and then reusing that declarative component in multiple places throughout the application. 
Declarative components can also be used in page templates. 
Declarative components can also be used in other applications, its possible after creating JAR file of that component.
2). What is region in Oracle ADF?
Ans). Tag name : <af:region>
The region tag allows dynamic content to be included in a master page. This tag is bound to a RegionModel. The model decides which viewId is to be included. The model has methods that allow pre and post processing of an include. See the javadoc for oracle.adf.view.rich.model.RegionModel. 
This component does not support any facets. 
Regions support nesting (one af:region component can contain another af:region component). 
Regions are not allowed to be placed inside of af:forEach, c:forEach, or other forEach-like tags because of limitations in how JSF handles component IDs and component state which would manifest in your application in obscure manners such as loss of component state. 
Regions are also not allowed to be placed inside of af:iterator because the region requires bindings to be established at the tag execution phase in order to perform its JSP include operations and the variables for iterators are not established until later in the life-cycle.
Regions in release 11g are reusable page flows. They have their own navigation rules, managed beans and ADFm page definitions. Each page within the region is a page fragment (jsff). Do not confuse the 11g af:region component with the 10.1.3 or Trinidad region. The 10.1.3 and Trinidad region components are single page fragments that do not have multiple pages, navigation rules nor managed beans. The 10.1.3 region is similar to the 11g page templates and declarative components.

The <af:region> will not stretch all included children, but it will stretch an included child if all of the following are true:

·         The region itself does not have a header
·         The region itself is being stretched
·         There is only a single included child
·         The child must be capable of being stretched
Example<af:region value="#{mybean.myRegionModel}"/>

3). What is <f:facet> ?
Ans). This tag is used to add a facet to the component means this tag is used to add its child as a facet of the closest parent component.
With the help of this tag we can add header and footer facet to the container component like panelGroup.

This tag contains one attribute :
name : This is the required attribute and is used to set the name of the facet. "header" and "footer" values can be used for this attribute.
4). How to skip validation in ADF?
Ans). Add immediate="true" to the button. This way all input fields which don't have immediate="true"will be skipped in processing.
This method mainly used for view layer validation skip.

5). How to make any field mandatory?
Ans). Add attribute required="true" to that specific field.

6). What is setActionListener?
Ans). SetActionListener – The setActionListener tag is a declarative way to allow an action source ( , , etc.) to set a value before navigation. It is perhaps most useful in conjunction with the “processScope” EL scope provided by ADF Faces, as it makes possible to pass details from one page to another without writing any Java code. This tag can be used both with ADF Faces commands and JSF standard tags.
Exmaple of this can be as follows. Suppose we have a table “employee”.We want to fetch the salary of an employee of some particular row and want to send this salary in Next page in process scope or request scope etc.So using this we can do this.
It have two attributes :
From – the source of the value; can be an EL expression or a constant value
To – the target for the value; must be an EL expression
1
<af:setActionListener from="#{row.salary}"
2
to="#{processScope.salary1}"/>

This setActionListener will pick value of salary of that row and store this value into salary1 variable.So anyone can use this salary as processScope.salary1.
It is very simple to use and very useful.

7). How to pass Values Between Pages?
Ans). The ADF Faces pageFlowScope scope makes it easier to pass values from one page to another, thus enabling you to develop master-detail pages more easily. Values added to the pageFlowScope scope automatically continue to be available as the user navigates from one page to another, even if you use a redirect directive. But unlike session scope, these values are visible only in the current page flow or process. If the user opens a new window and starts navigating, that series of windows will have its own process. Values stored in each window remain independent.
Like objects stored in any standard JSF scope, objects stored in the pageFlow scope can be accessed through EL expressions. The only difference with the pageFlow scope is that the object names must use the pageFlowScope prefix. For example, to have a button's label provided by a managed bean stored in the pageFlow scope, and to have a method on the bean called when the button is selected, you might use the following code on your page:
<af:commandButton text="#{pageFlowScope.buttonBean.label}"
                  action="#{pageFlowScope.buttonBean.action}"/>
The pageFlowScope is a java.util.Map object that may be accessed from Java code. The setPropertyListener tag allows you to set property values onto a scope, and also allows you to define the event the tag should listen for. For example, when you use the setPropertyListener tag with the type attribute set to action, it provides a declarative way to cause an action source (for example, commandButton) to set a value before navigation. You can use the pageFlowScope scope with the setPropertyListener tag to pass values from one page to another, without writing any Java code in a backing bean. For example, you might have one page that uses the setPropertyListener tag and a command component to set a value in the pageFlowScope scope, and another page whose text components use the pageFlowScope scope to retrieve their values.
You can also use the pageFlowScope scope to set values between secondary windows such as dialogs. When you launch secondary windows from, for example, a commandButtoncomponent, you can use a launchEvent event and the pageFlowScope scope to pass values into and out of the secondary windows without overriding values in the parent process.
Tip: Instead of using the setActionListener tag (which may have been used in previous versions of ADF Faces), use the setPropertyListener tag and set the event type to action

8). How to Use the pageFlowScope Scope Within Java Code

Ans). You can access pageFlow scope from within any Java code in your application. Remember to clear the scope once you are finished.
Note: If your application uses ADF Controller, then you do not have to manually clear the scope.
To use pageFlowScope in Java code:
To get a reference to the pageFlowScope scope, use the org.apache.myfaces.trinidad.context.RequestContext. getPageFlowScope() method.
For example, to retrieve an object from the pageFlowScope scope, you might use the following Java code:

import java.util.Map;
import org.apache.myfaces.trinidad.context.RequestContext;
Map pageFlowScope = RequestContext.getCurrentInstance().getPageFlowScope();
Object myObject = pageFlowScope.get("myObjectName");
To clear the pageFlowScope scope, access it and then manually clear it.
For example, you might use the following Java code to clear the scope:

RequestContext afContext = RequestContext.getCurrentInstance();
afContext.getPageFlowScope().clear();

9). How to pass ''af:selectOneChoice'' value to other page?
Ans). Add valuePassThru="true" attribute to select list. 

10). What are types of ADF Faces components?
Ans). ADF Faces components:
Data components
Input components
Layout components
Navigational components
Output components

11). Why 'timeZone' attribute is required when <af:convertDateTime is used?
Ans). When <af:convertDateTime is used it takes by default GMT time, for Indian timing we need to take GMT+5.30
EX.
<af:inputText id="compId3882"
                                            label="#{messageBean['SS_DATE_OF_BIRTH']}"
                                            disabled="true" maximumLength="50"
                                            value="#{bindings.DateofBirth.inputValue}"
                                            inlineStyle="font-size:smaller; font-weight:normal; font-    
                                            family:Arial;color:rgb(69,69,69);">
   <af:convertDateTime timeZone="GMT+5:30" pattern="dd/MM/yyyy"/>
 </af:inputText>

12). What is the difference between trinidad.config and trinidad.skins?
Ans). trinidad.config file is ceated when you create a webcenter portal application. This is used to register the skin-family you are going to use for your entire application. Trinidad.skins is used when we use skin as a Jar file. This file provides a mapping between the Skin Id and the actual path where the skin exists.

13). What is the difference between an action and an action listener?
Ans). Actions are designed for business logic and participate in navigation handling, whereas action listeners typically perform user interface logic and do not participate in navigation handling.
Action listener is a class that wants to be notified when a command component fires an action event.
Action returns String ActionListner returns void.
·         Action used for page navigation with faces-config.xml or adf-config.xml, ActionListner is used for event handling, to retrieve data & other operations, its used with backing beans or bindings.
·         Action use - for page navigation, ActionListner use - check box, drop down box.

13). What is a view scope?
Ans). view-state allocates a new viewScope when it enters. This scope may be referenced within the view-state to assign variables that should live for the duration of the state. This scope is useful for manipulating objects over a series of requests from the same view.

14).What is the difference between visible property and render property
Ans).The visible property is set to true/false based on the requirement whether we want to see the field on the page or not at run time. The field or component still exists on the page, though hidden. The render property is used to conditionally load the component based on a criteria.

15). How do you define pagination in adf?
Ans). It was not possible to do 
pagination on af:table component before R1 release 11.1.1.7, although this feature was exist in 10g but not available in previous 11g series.
In 11g series there were some customization approach for pagination: 
1. We define custom pagination in ADF by creating a custom table as a taskflow using the af:iterator tag. This renders the collection of data just as a table renders it. Now we bind the value property of iterator to collection model from ADF bindings declaration and set the number of visible row to, say 15.
2. Using JavaScript
3. Customizing VO java code,

16). What are validators and converters?
Ans). Validators and Convertors are used to provide conversion and validation capabilities to the ADF input components respectively. Converters convert the valurs on ADF forms to the type in which the application accepts them after the values are edited on the form and submitted. Validators re used to impose validations on the inpiut components.

17). What is the difference between setting an immediate=true on a button and immediate=true on a text field?
Ans). When immediate is true on a button, the command’s action and ActionListeners, including the default ActionListener provided by the JavaServer Faces implementation, will be executed during Apply Request Values phase of the request processing lifecycle, rather than waiting until the Invoke Application phase.

In case of a text field, by default, values are converted and validated together in the Process Validators phase. However, if you need access to the value of a component during Apply Request Values – for example, if you need to get the value from an actionListener on an immediate commandButton – then setting this to “immediate” makes that possible.

18). What is inter-portlet communication?
Ans). Inter-portlet communication is achieved when an action in one portlet triggers a response in the second portlet. Its a communication bridge between two portlets. For eg, one portlet contains a checkbox containing list of products. When i choose a product from the list and click on submit, the other portlet displays the details of the respective product.

19). What is PPR and how do you enable Partial Page Rendering(PPR)?
Ans). PPR is a feature supported by ADF Faces, using which we can render a small portion of a HTML Page, without refreshing the complete page.
It is enabled by.- Setting AutoSubmit property to true on the triggering element.
- Setting the PartialTriggers property of target component to refer to component id of the triggering element.

20). Explain Iterator RangeSize Attribute
Ans). Iterator bindings have a rangeSize attribute that the binding uses to determine the number of data objects to make available for the page for each iteration. This attribute helps in situations when the number of objects in the data source is quite large. Instead of returning all objects, the iterator binding returns only a set number, which then become accessible to the other bindings. Once the iterator reaches the end of the range, it accesses the next set. 
Example shows the default range size for the CustomerInfoVO iterator.
Example RangeSize Attribute for an Iterator
<iterator Binds="CustomerInfoVO" RangeSize="25" DataControl="StoreServiceAMDataControl" id="CustomerInfoVO1Iterator"
ChangeEventPolicy="ppr"/>

By default, the rangeSize attribute is set to 25.

You can set it to -1 to have the full record set returned.


Cheers Guys :)

Eclipse With Python

Hi Guys, Today i'll share how to start python project in eclipse IDE. to start Py development in eclipse we need to add Py Dev plugi...